Participate! Collaborate! Communicate!

There are so many great online projects you can become part of that allow you and your students to collaborate and communicate with other classes around the world. Over the last eight years, my students and I have participated in a variety of different projects. Collaborating in these projects has led to other opportunities for my students. We've been able to Skype and share VoiceThreads with other classes around the world.

One of the first online projects that I became a part of many years ago was a postcard exchange. I found someone who was recruiting a class from each state in the U.S. to join. (I have also participated in International Post Card Exchanges.) Each school creates enough postcards with information about their school, city, state, to send one to each of the other schools in the exchange. In return, your school will receive one postcard from each of the other schools too. This means you could potentially receive 49 postcards! What kid doesn't love to get something in the mail? I admit, even I get excited to see another postcard in my mailbox in the school office! Check out Mike Ryter's site to see all of the cards he's received in our postcard exchange this year: Mr. Ryter's 6th Grade Godwin Social Studies.

Our Postcard Sent to Mr. Ryter's Class

You may be asking how this postcard exchange can be used as a learning experience in the classroom. Here are some ideas. First, I teach a lesson on writing a friendly letter. This is important to do before writing our messages on the postcards. Then I teach a lesson on how to write an address on a piece of mail. It amazes me how many students don't know how to do this, but then how many of them have ever used snail mail before?! I even have my students draw the picture that we use on the front of the postcard using a paint program on the computer. When the postcards from other schools start arriving, you could practice map skills to find the location of the school on a U.S. map. I created a Google Map and marked each school as their postcard arrived (SEE BELOW). If the other schools list how many students are in their school or their class, you could use this information in math to graph/average/analyze. There are probably lots of other ways you could use this postcard exchange.

View U.S. Postcard Exchange in a larger map

Another site that I would recommend for online projects is jenuinetech.com run by Jennifer Wagner. Jen organizes many projects during the school year including O.R.E.O. stacking, Christmas Card exchanges, St. Patrick's Day graphing, and more. My students and I have participated in these projects for many years and it is always a lot of fun!

Every spring, I sign the students in grades 1-8 up to participate in World Math Day. This is a great, friendly competition of math facts between students of similar age/ability levels from around the world. Guaranteed to be more fun than doing flash cards at the supper table!

This year my students in grades 2-8 are learning the art of blogging using Kidblog. We have had several opportunities to collaborate with other students through our blogs. The 6th graders participated in Quadblogging last fall. The middle school students are currently participating in the 100 word challenge. Next week the 4th graders will be communicating with other 4th graders who are attending a Catholic school to share the fun activities they do for Catholic Schools Week. I wrote about the art of blogging in my previous post Writing + Audience = Blogging if you'd like to know more.

I am intrigued by these new projects in which I have not yet participated...the Global Read Aloud Project, Collaboreyes, and the Flat Classroom Project. Other sites where you might find project partners include: ePals, Global School House, AtoZTeacherStuff Forums.

Joining these projects brings the four corners of the world a little closer to your doorstep and allows your students to collaborate and communicate with students from all over the world. Give it a try!


Writing + Audience = Blogging

This year I created Kidblog accounts for all of the students in grades 2 through 8. I decided to have them practice writing by writing for an audience. This makes them a little more accountable, and it's more fun. Most of the students are having a really great time writing posts. At first, I gave them a topic for the week to get them started. We talked about the types of things they might consider writing about. I turned my whiteboard into a make-shift bulletin board where we put up words for blogging inspiration. I've just left them up there all year for a reference since I don't use the whiteboard to write on anyway. Eventually the students started gaining more confidence and began writing about things that interested them. I still have a topic each week for those reluctant writers.

After the students tackled the process of writing quality blog posts, we started discussing how to write comments on someone else's blog. I showed my students this video that Linda Yollis and her students put together to help explain what makes a good comment:


To give the students a chance to write for an audience beyond the walls of our little school, I signed the middle school students up to be part of a wonderful blogging project called Quadblogging. This was the creation of David Mitchell, a Deputy Headteacher of a primary school in the UK. How does Quadblogging work? Four schools are assigned to work together. One of the schools' blogs is the focus the first week of the 4-week cycle. The other three schools read and comment on that blog for the week. Then the three other schools have their turn in the spotlight for a week. We were assigned to work with two UK schools and a school in New Zealand. The students were so excited to participate in this project! We were even able to Skype with two of the schools which just added another layer to the learning.

Another great blogging opportunity is coming up on February 29th...again the creative genius of David Mitchell with the help of Peter Ford and John Sutton. To recognize this special Leap Day that only comes around once every four years, they've created a site where people will be able to add a blog post of their own. It will be open to anyone, not just educators and students. For more information about this project, click the link below.

Photobucket

One of the bonuses about using a blogging site like Kidblog is that it acts as a portfolio of sorts as well. All of the students' posts are archived on their blog from the beginning of the year through the present. It is a great way to see how much the students' writing has improved over time. Writing is such an important life skill. Blogging is a great way to motivate students to practice their writing and to improve their writing skills because they know there is an audience reading what they have posted. Students are also motivated to write more by the comments that are left on their blog.

If you haven't started blogging with your students, you really should give it a try!


Flashcards - 21st Century Style


When it comes to studying math facts, vocabulary words, etc..., flashcards have always been a great tool to use. It got me thinking how can we take this concept and bring it into the 21st century? What would make it more interesting and exciting to students, so they would be more likely to use the flashcards?

The fourth and fifth grade students are busy learning the titles and authors of 40 different books for a reading competition. The past two weeks in Library I quizzed them on a few of the titles and authors and could see that they were not making any progress. Most of them still did not know the information. We're not using mobile devices here at school yet (hopefully this will be a possibility in the near future), so I downloaded a free flashcard app to my iPhone. Then I created a stack of cards with the titles and authors. When the fourth and fifth graders came to Library this week, we used the digital flashcards on my iPhone and all of a sudden it was much more fun and exciting to do! Many of the students have iPod touches and other devices at home, so I suggested they create their own flashcards to study with.
 

What can students do if they don't have a mobile learning device of their own? What if your school isn't allowing students to bring their mobile learning devices to school? In PowerPoint, students could create a slide with a vocabulary word, math fact, etc... The next slide could reveal the answer. Students could quiz themselves or work with a partner or group to study. The downside is that this requires you to be working at a computer.

Students could quiz each other from the comfort of their own homes using an online whiteboard site like Scriblink, Dabbleboard, Twiddla, or Scribblar.

Perhaps students could record themselves using a USB microphone stating the facts and answers. These could be uploaded to Audioboo, saved on the computer, or burned to a disc to be played back later.

If you and your students are using a site like Edmodo or Twiducate, the students could quiz each other by posting a message to the whole class or to another student in the class.

These are just some of the many ways to bring the idea of flashcards into the 21st century. No matter which of these approaches your students decide to use, they'll be ahead of the game just be taking the time create their study aid. It's really a win-win situation!


Creating Displays with Student Photos

I have found that students love to see their photo on display in school and have tried to come up with some fun ways to create displays using a photo of each student in our school. To do this, I first take all of the their pictures with a digital camera during Computer class. If you have all of their school pictures on file somewhere you could use those too. Our students wear uniforms to school...either a red or a white polo shirt...so I was inspired to use the red and white of their shirts to create a U.S. flag with their photos. To really accentuate the red and white color, I had them stand in front of a piece of red or white paper depending on their shirt color. I printed out wallet size pictures. We have about 250 students. If you have a larger school, you could print thumbnails instead. My original plan was to create the stripes with the students' pictures and put the teachers' pictures on the stars. In the end, I just wrote the teachers' names on the stars. Once I had everything organized I recruited the help of some middle school students to actually construct the display. I created the U.S. flag during the last presidential election.

This past December I used the same red/white stripe idea and had the middle school students help me create giant candy canes. In the first example, I placed any extra photos around the flag on a piece of red bulletin board paper. With the candy cane display, the extra photos were placed on snowflakes that some of the students cut out.

These displays were a lot of fun to look at. If you create something like this, I suggest you put it up somewhere that students and parents can easily see it. Students love to look for their picture, and parents love to spot their son/daughter in the display.

What can YOU make out of a heart shape?

It won't be long before it's Valentine's Day! Time to start planning those Valentine activities now so you can put them on display for the big day. You could have your students make a picture on the computer. It's a great way to practice using the mouse, to learn how to use the tools in a drawing program like Kidpix, and to inspire creativity. What kind of picture do you suppose a first or second grade student could create if they started with a heart shape? Of course that would depend on which way the heart shape was facing. If it's a regular heart shape, you could create a bunny...

a butterfly or a ladybug...

If the heart is facing sideways, you could create a fish or maybe a spider...

If it's an upside down heart, you might turn it into a cat or a puppy dog...
First and second grade students have pretty good imaginations. With a little help from you, they can come up with some creative ways to turn a heart shape into something fun. What can YOU make out of a heart shape?

There's a Wocket in my Pocket!


I realize that March is still nearly 2 months away, but I thought I'd share a fun project that I do with the pre-k students. If you like planning ahead, you can get this in your planbook early!


As you may know, Dr. Seuss's birthday is March 2nd. It's easy for me to remember this because it's also my oldest daughter's birthday! I like to do activities revolving around Dr. Seuss's stories that week. The PreK boys and girls and I read There's a Wocket in my Pocket in the Library. Then during Computers we create our own Wockets using Kidpix. We look at the illustrations in the book and make note of all the different characteristics of the various Wockets. They are different colors. Some have really long tails. Some have feathers coming out of the top of their head. Some have duck feet. I encourage the students to be creative. It's a lot of fun to see what they come up with!

These are some of the pre-k Wockets from past years:

When their Wockets are finished and saved, I print them as wallet-sized color pictures. I have a piece of tagboard for each student that says, "There's a Wocket in my Pocket", at the top and has a book pocket attached underneath. (If you're wondering what a book pocket is, check out the picture below.) The pictures are the perfect size to fit in these book pockets. The PreK boys and girls are excited at the end of class when they find out that they have their very own Wocket in a Pocket to take home!

Word Clouds for Younger Grades


Word clouds are a fun way to present words visually.

Kindergarten/PreK teachers can create posters to put up around the classroom as they teach the letter(s) of the week. A great site for this is ImageChef. Here's an example I created of the letter S made up of all sorts of age-appropriate words that begin with the letter S.

How do you do this? Choose "Word Mosaic". Click on the Initials tab. Type in the letter you want to work with. Type all of the words that start with that letter that you want to use in the text box. Choose the Font style you like from the drop down menu. Click on Preview to see your creation. If you want to save the image to your computer, click on Export...choose an image size...right-click and save the image to your computer or drag the image to your desktop. To make a poster, insert the image into Word, Publisher, or some other program.


First and second grade students can easily create word clouds of their own. You might want to start with a site like Wordle, a very easy site to use. I've had the first and second graders create Mother's Day word clouds similar to the one here to give as a gift. They had fun choosing the layout, fonts, and colors to really personalize it for their mom.

How do you do this? You might want to brainstorm possible words to use before you begin this activity. Then have those words available on a handout or projected somewhere in your classroom. Type your words in the text box. Remember that in Wordle, the size of a word is determined by the number of times it is typed in the text box. Click GO when you have finished adding words. To personalize your word cloud, you can select options from the Font, Layout, and Color tabs. When your word cloud is finished, you can print it. One downside of Wordle is that you can't download the finished image. To get around this, I use PrintScreen to copy the whole desktop and then paste it into Paint. Then crop the excess and save the image.


Once the younger students have mastered the art of creating a word cloud in Wordle, you could have the third, fourth, and fifth grade students use a site like Tagxedo to create something a little more advanced. Since it is winter, we are going to create snowflake word clouds like the one here. The students are reading Snowflake Bentley and learning how each snowflake is unique. These snowflake word clouds will represent each unique student in our class.

How do you do this? Have the students create a list of words that describe themselves. Choose the snowflake shape from the Shapes menu. Click on Load... under the Words category. Type the words in the text box (not the webpage box). To personalize the look of the snowflake, students can adjust the color, font, layout, etc... When you are ready to finish, download the image to your computer by clicking on Save|Share|Print.

Have fun creating these visuals to post in the classroom, to give as gifts, or to reinforce concepts learned in class!

So You Want Your Students To Create a Podcast?

Two years ago I went to a podcasting workshop and got really excited about trying it out with my students. For some reason, I just didn't get myself comfortable and organized enough to try teaching it until just this year. After my first go-around, I thought I'd share some tips based on my experience.


  1. Spend some time discussing beforehand what a podcast is. Look at examples of podcasts created for students and podcasts created by students. I found this wiki to be very useful: Examples of Educational Podcasts.
  2. Discuss the basic parts of a podcast: intro (episode name, tagline, etc...), bumper music, segments, outro. This Radio WillowWeb Handbook is a great resource. 
  3. Make sure that students write out a script for their part. It will save time in the long run. It helps if they have their thoughts written down when they begin recording. Without a script, there are a lot of mistakes made and time wasted.
  4. For our first attempt, I didn't make any rules about how many students were recording at a time. There were a lot of groups who wanted to have a conversation style segment in their podcast. This ended up becoming a problem. Most of the groups got silly and giggly instead of getting their work done. On our second attempt, I said that only one person could speak in each segment. It really helped speed up the process. Just a thought!
  5. I would also strongly suggest that you have the students record their parts in chronological order. There will be less editing necessary later. Another time-saving tip!
  6. We recorded our audio clips using Audacity which you can download for free to a pc. You could use GarageBand if you are on a Mac. Before students begin recording their audio for the podcast, spend some time showing them how to use the program. I also created short videos showing how to record audio, how to save the project, how to use the editing tools, and more for students to use as a reference later. I stored these videos on our school server for easy student access.
  7. Make sure to have background music available for students to use or sites that they can download music from. I had students download music from Television Tunes. Be sure to adhere to copyright laws.
  8. Give the students a reason to create their podcast. My students did book reviews which I posted on the Library page of our school website. They were told that other students and parents would be listening to them. This was a motivator to do a nice job.
After my first experience teaching podcasting, I can confidently say that I will be doing this again next year. The students had a lot of fun! They'll be able to use this knowledge to create podcasts for other classes too.

Great Gadgets!


I love all of the wonderful technology that I have access to in the Computer Lab everyday. Obviously, there are the 31 desktop computers, the laser printer, the scanner, the SMARTboard, the projector, and a laptop. Nothing really unusual there, right? There are several other pieces of technology that I use on a regular basis and would recommend to any classroom or computer teacher. What are they you ask?


The first is called the Easi-Speak USB Microphone. This sturdy little microphone is awesome. You can record mp3s and download them onto a computer in just a few minutes. Because they are mp3s, they can be embedded into Smart Notebook for a seamless presentation. I found this and the next gadget that I'll tell you about on my visit to BETTs in London a couple of years ago, but they are available for purchase online at various websites.


My second recommendation is for a wireless mouse/keyboard. I purchased a Cideko Wireless Air Keyboard from Amazon. This fun gadget looks a bit like a game controller but comes in very handy in the classroom. With this tool I can be freed from standing right next to my laptop during a lesson. It allows me to move around the room to monitor student progress.


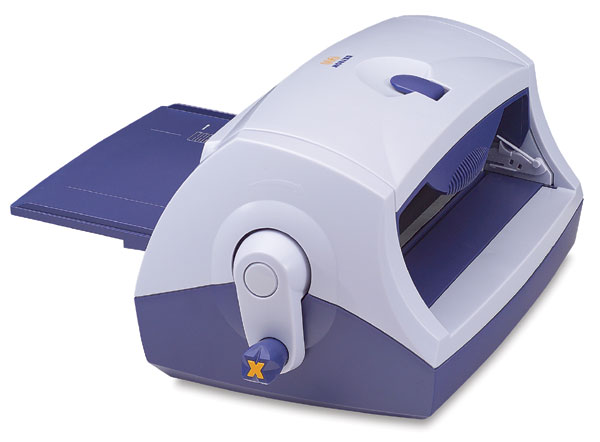
The last gadget I'll mention here isn't quite as techie as the first two but awesome nonetheless! It is my Xyron machine. A Xyron is a machine that turns a piece of paper into a sticker or magnet. After we create our works of art on the computer and print them out, the students love being able to turn them into their very own sticker or magnet.

What fun gadgets do you use in your classroom? What tools would you hate to have to do without? Share your thoughts by commenting below.

Keyboarding Boot Camp

Several years ago I found a great idea on Beth Newingham's website for a keyboarding camp. She has explained her ideas in this article: Take Your Students to Typing Camp! I really liked her ideas, but had to modify them a bit to make it work for my situation. I only see the third graders twice a week, so I wouldn't be able to spend a whole week or two dedicated to a typing camp unit.

I changed our theme slightly from Keyboarding Camp to Keyboarding Boot Camp. Each student has a dog tag with their name on it. These are hanging on the wall in our Computer Lab at the beginning of the school year and create a nice display. The students wear their dog tags during class and are able to keep them once we have finished all of our keyboarding lessons. As soon as we have learned all of the keys that spell a student's name, I take a picture of them wearing their dog tag and add it to the display. It's exciting to see who will be able to type their name each time!

Not only do students get to keep their dog tags when we finish our keyboarding boot camp, they are also able to earn other charms to add to their chain. For example students earn a hand charm when they have successfully completed all of the keyboarding lessons. You could be creative with this and give charms for other reasons as well. (I purchased dog tags, chains, and charms from Fitness Finders, Inc.)

I wrote a Keyboarding Boot Camp chant that has three verses. The refrain lists the home row keys. The hope is that learning and singing this will help them remember the home row keys which will in turn help them with correct placement of their hands on the keyboard.

The students learn the first verse the first day of our boot camp.
Left, left, left-right-left
We are learning the home row
These are the keys we have to know
Our fingers stay on these eight keys
Reach somewhere but come home please
Sound off: a, s
Sound off: d, f
A, s, d, f, j, k, l, semicolon!
They learn the second verse after completing lessons on the Home Row.
Left, left, left-right-left
Now we know the whole home row
Learning keys, we’re on a roll
Press the space bar with one thumb
Don’t use two, that would be dumb
Sound off: a, s
Sound off: d, f
A, s, d, f, j, k, l, semicolon!
They learn the third verse after learning all of the keys.
Left, left, left-right-left
We finished learning all the keys
Our parents surely will be pleased
Keyboarding boot camp was lots of fun
We’re sad to say that it’s all done
Sound off: a, s
Sound off: d, f
A, s, d, f, j, k, l, semicolon!
As we learn each verse, I record them singing it and post it on our school site using Audioboo.

The Keyboarding Boot Camp theme adds some excitement and fun to keyboarding which could be a little dull and monotonous otherwise. Thanks to Beth Newingham for the inspiration!